Getting started at Cache Up NB
If you’re not sure where to start on this new site, this article will answer the most basic questions. Read on for more.
Sooooooo, you’ve found your way to Cache Up NB and you’re not sure where to get started. Well, this post is intended to help those people who have just arrived find their way through all of the resources that can be found on this site. With that said, let’s get started.
Click on the section you would like to know more about:
- Registering your username
- Getting an avatar
- Commenting on articles
- Submitting site content
- Adding Your Profile To “Profiles”
The first thing you should do when you visit this site for the very first time is Register Your Username. Cache Up NB is all about contributions from it’s visitors and you can’t contribute without registering your username. In most cases, your username should be the same as your regular geocaching name.
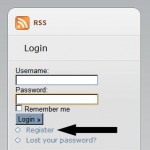
 To get started in registering your name on this site, navigate to the right hand side of the page where you should see a login box similar to the one shown in this picture.
Just below the “Login” button is a link labeled “Register”.
If you click this link, you will be brought to the Cache Up NB registration page. It is from this page that you will fill out all of the basic fields to register your username on this website.
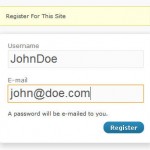
 The username registration screen is actually quite simple. All you need to do is enter in the “Username” that you wish to use (your Geocaching.Com name) and then an email address that you will associate with this account.
The email address must be a valid email address for which you have access to because Cache Up NB will email you your initial login password. If you do not use a valid email address, you cannot obtain a valid password.
Once you fill out both of those fields, simply click the “Register” button and your username will be registered on the site. If you happen to choose a username that is already in use, you will be prompted for a new username again.
Within a few minutes (usually seconds), you should receive an email from wordpress@cacheupnb.com giving you your username and new password. Please make note of this password as you will need it to log in. Along with that, you will also be sent a link for which you can click on and log into Cache Up NB.
Click that link.
 You will be brought to the initial login page for Cache Up NB. Simply enter in your new username and the password given to you within the email you received and click Log In.
Once you have logged in, you will be redirected to the main site and should now see a “Welcome Username” (where Username is YOUR username), a blank avatar, and a couple of links.
As long as you are logged into Cache Up NB, you should always see that welcome message on the right hand side.
We definitely recommend that once you have logged in successfully the first time, you should click the “Profile” link under your welcome badge, and scroll down to near the bottom and create a new password. By choosing your own password, it will make it easier for you to login the next time you visit the site.
Many users have an avatar associated with their username. An avatar is really just a picture or photo that displays beside their username in comments and forum posts. Cache Up NB offers two ways for which you can include an avatar with your username.
1) Use Gravatar. Gravatar is a “global” avatar website. Instead of having to upload an avatar to website after website, you can simply upload a single avatar to your account on Gravatar, and then associate it with an email address. All websites that support Gravatar will automatically pull your avatar based on your email address.
So for our sample user above, JohnDoe used his email address john@doe.com for Cache Up NB. If John were to sign up for a Gravatar under his john@doe.com email address, the avatar he has on Gravatar.com would automatically show up on Cache Up NB. No additional setup required.
Cache Up NB uses Gravatar as an avatar service because we are powered by WordPress. WordPress automatically has this feature enabled. Cache Up NB is not directly associated with Gravatar nor do we receive anything for people signing up there. It’s merely part of the WordPress product.
You can sign up and configure your Gravatar account here.
2) Upload your own avatar locally to Cache Up NB. Many people would prefer not to associate themselves with yet another website so they prefer to simply upload their own avatar to Cache Up NB directly. The process is relatively simple.
- From the main website page, click on the “Profile” link found directly under your “Welcome” badge on the upper right hand side. This will bring you into your profile page for Cache Up NB. This page contains your name, email address, password change options, and many other options associated with your specific user profile.
- Scroll down to the very bottom of the profile page and you will find an option that says “Avatar Upload” (see photo).

- From here you can see what your current avatar is. If you already have a Gravatar avatar, it will be displayed here.
- Click the “Choose File” option to choose a local file (that you will upload) that will become your new avatar.
- Click the “Update Profile” button below and your new avatar file will be uploaded.
- You will be redirected back to your profile page where you can then scroll down and see if the avatar has uploaded correctly.
- To exit the profile section, click on the “Cache Up NB” link in the top left hand corner.
Now all of your comments and forum posts will have your avatar included in them. You can revisit your profile page at any time to change or remove your avatar.
Comments are welcome on any article that is posted to Cache Up NB. Now comments can be anything from your own opinion about the topic being discussed, or perhaps you want to share a story or piece of information that is similar or related to the topic at hand. Regardless of what you want to say, all comments are welcome.
There is only one requirement in order to be able to add a comment: You must be logged in! If you are not logged in to the site, you cannot post comments. Anonymous comments are not permitted on Cache Up NB to minimize the amount of spam that appears.
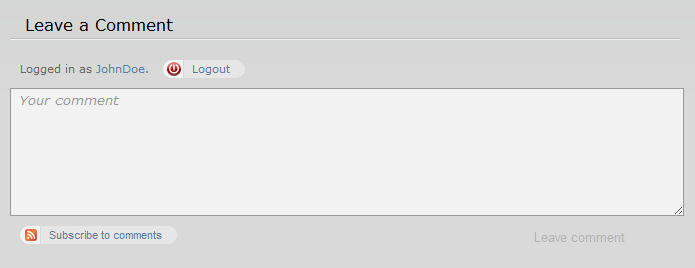
To comment on an article, scroll to the bottom of the article and simply enter in whatever your comment may be. Below is an example:

You simply type out your comment, click “Leave comment” and it will be submitted.
Articles shown on the main page of the site can be commented on by clicking the “Read More” link on the bottom right hand of the post. This will load the full article and display the comments box at the bottom of the post (as seen in the above image).
If you have never posted a comment before then your comment will not be displayed immediately. All first time commenters have their comments held for moderation by an administrator. As soon as you have your comment(s) approved, you will not be moderated again.
In other words, once you have a single approved comment, all comments after that are automatically approved.
This moderation helps to reduce spam and unwanted comments from appearing on our articles.
If you have something you would like to add to this site, the easiest way to get it added is to use the “Submit News” link found along the top navigation bar. Details on how to use this can be found below (keep reading).
Submissions can pretty much be anything as long as it has something to do with geocaching. Articles can contain information about (but not limited to):
- Interesting new caches
- Logs you’ve seen or received on caches
- Upcoming events
- Editorials
- New trails or trail activity
- GPS Hardware & Software
- Trackable items
- New stores to visit for caching gear and swag
- Funny caching stories
- Websites / Tools for caching
- Many more
Try to do your best to not submit something that has already been submitted or appears somewhere else on the website. If there is duplication, the article will not be approved and you will receive a message telling you why. Do not submit articles that are merely commentary on other posts. Please use the comments feature for that.
If you choose to submit something, here’s the basic rundown of how it all works.
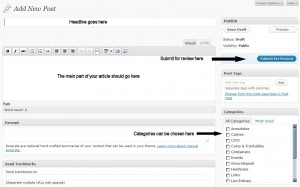
 When you click on the “Submit News” link, you will be brought to a new page called “Add New Post”. You then enter in your “headline” for the article. The headline is what will appear as the main link for the article when it is displayed. Try to make the headline interesting and have it reflect what your article is actually about.
Just below the “headline” box is the main body window for your article. There is a toolbar above it for performing basic formatting like bold, italic, bullets, etc. You would write the “body” or main part of your article in this box. Feel free to format it any way you want and apply any kind of styles you wish to it. You can add “links” by highlighting a piece of text and then clicking the little “link” icon. You can also embed images and video by clicking the little “film” icon. You do not have the ability upload any images or other content. You have to reference them using a URL.
Once you have completed writing your article, you should choose at least one category to assign it to. Categories can be found as checkboxes along the right hand side. You can have more than one category on a post. Simply check off the categories that apply to your post. If you cannot find a category that suits your post, do not pick one and simply put a note at the bottom of your post of what you think the category should be. An administrator can decide whether or not to create a new category for you.
When you are done with categories, you are ready to “Submit” the article. In the upper left hand corner of the page there is a blue button marked “Submit for Review”. Click that button and your article will be placed into the queue to be reviewed by a moderator/administrator.
As a general rule of thumb, try to make your submissions more than just a single line. These types of submissions will likely be deleted and not published.
That’s it! Feel free to submit as many articles as you wish. The more stuff we get, the more we can share!
So you’ve become a regular here at Cache Up NB and now you want to have your profile displayed with the other profiles found up on the main page. How do you go about this? Well, it’s easier than you think.
There’s really two ways you can do this.
- Submit a news article via the Submit News link on the navigation menu and simply choose “Cacher Profile” as your category. This will get submitted to the administrators who will then check the submission and if there are no issues with the profile, they will approve it and add it to the profiles drop-down. This is probably the easiest way to get your profile added.
- Go into your profile (found under Dashboard) and fill out the profile information in here. This information is not linked to a profile page on the navigation menu but it can be added later. Once this is filled out, send an email to the admin (About|Contact) and let them know you want to have your profile copied from your user account to the profiles drop-down.
Regardless of which method you choose, you cannot “upload” any images. If you want to reference images you will need to reference their location to somewhere else on the web, or email the admins directly to have them upload the image and add it to your profile.
Also, if you would like to simply have your name listed on the profiles drop-down, but want it to send the user to your geocaching.com account, please use the contact form for this.


Hi all,
This is my 1st log on this site. Hope to see a logo next time I log in. I found a survival forum that might interest some of the members http://www.wildsurvive.com/ in which I am Woodman…
See you on the trails
#1 Scout
I guess I should have read this more closely.
I was trying to put a link in an article I wrote and I kep clicking the link icon without result. Now I see what I have to do:
Copy the url. paste it on the page. Highlight it and then click the icon.
If I a wrong, I am certain somebody will correct me
You don’t even need to do that. Just highlight whatever text you want to “be” the link and then the link icon is active and you can put it in there.